Build Your Own SDD Workflow
- Published on

Spec-driven development works. Planning before you code catches bad assumptions early, keeps scope honest, and gives the AI enough context to write code you'd actually ship. That's not the problem.
The problem is ceremony. GitHub spec-kit gives you seven steps, multiple checkpoints, and templates designed for large teams coordinating across repos. When you're adding a component or fixing a bug, that's a lot of overhead for a Tuesday afternoon.
And it's not like there's a shortage of alternatives. New AI workflow repos show up weekly. Everyone's got an opinion on the "right" way to structure AI-assisted development.
Here's the thing. What if you just built the one that fits how you think?
That's what this article is. We'll build a 4-step SDD workflow from scratch and wire it into SpecKit Companion so you can see and run each phase visually. Four commands, four files, zero ceremony.
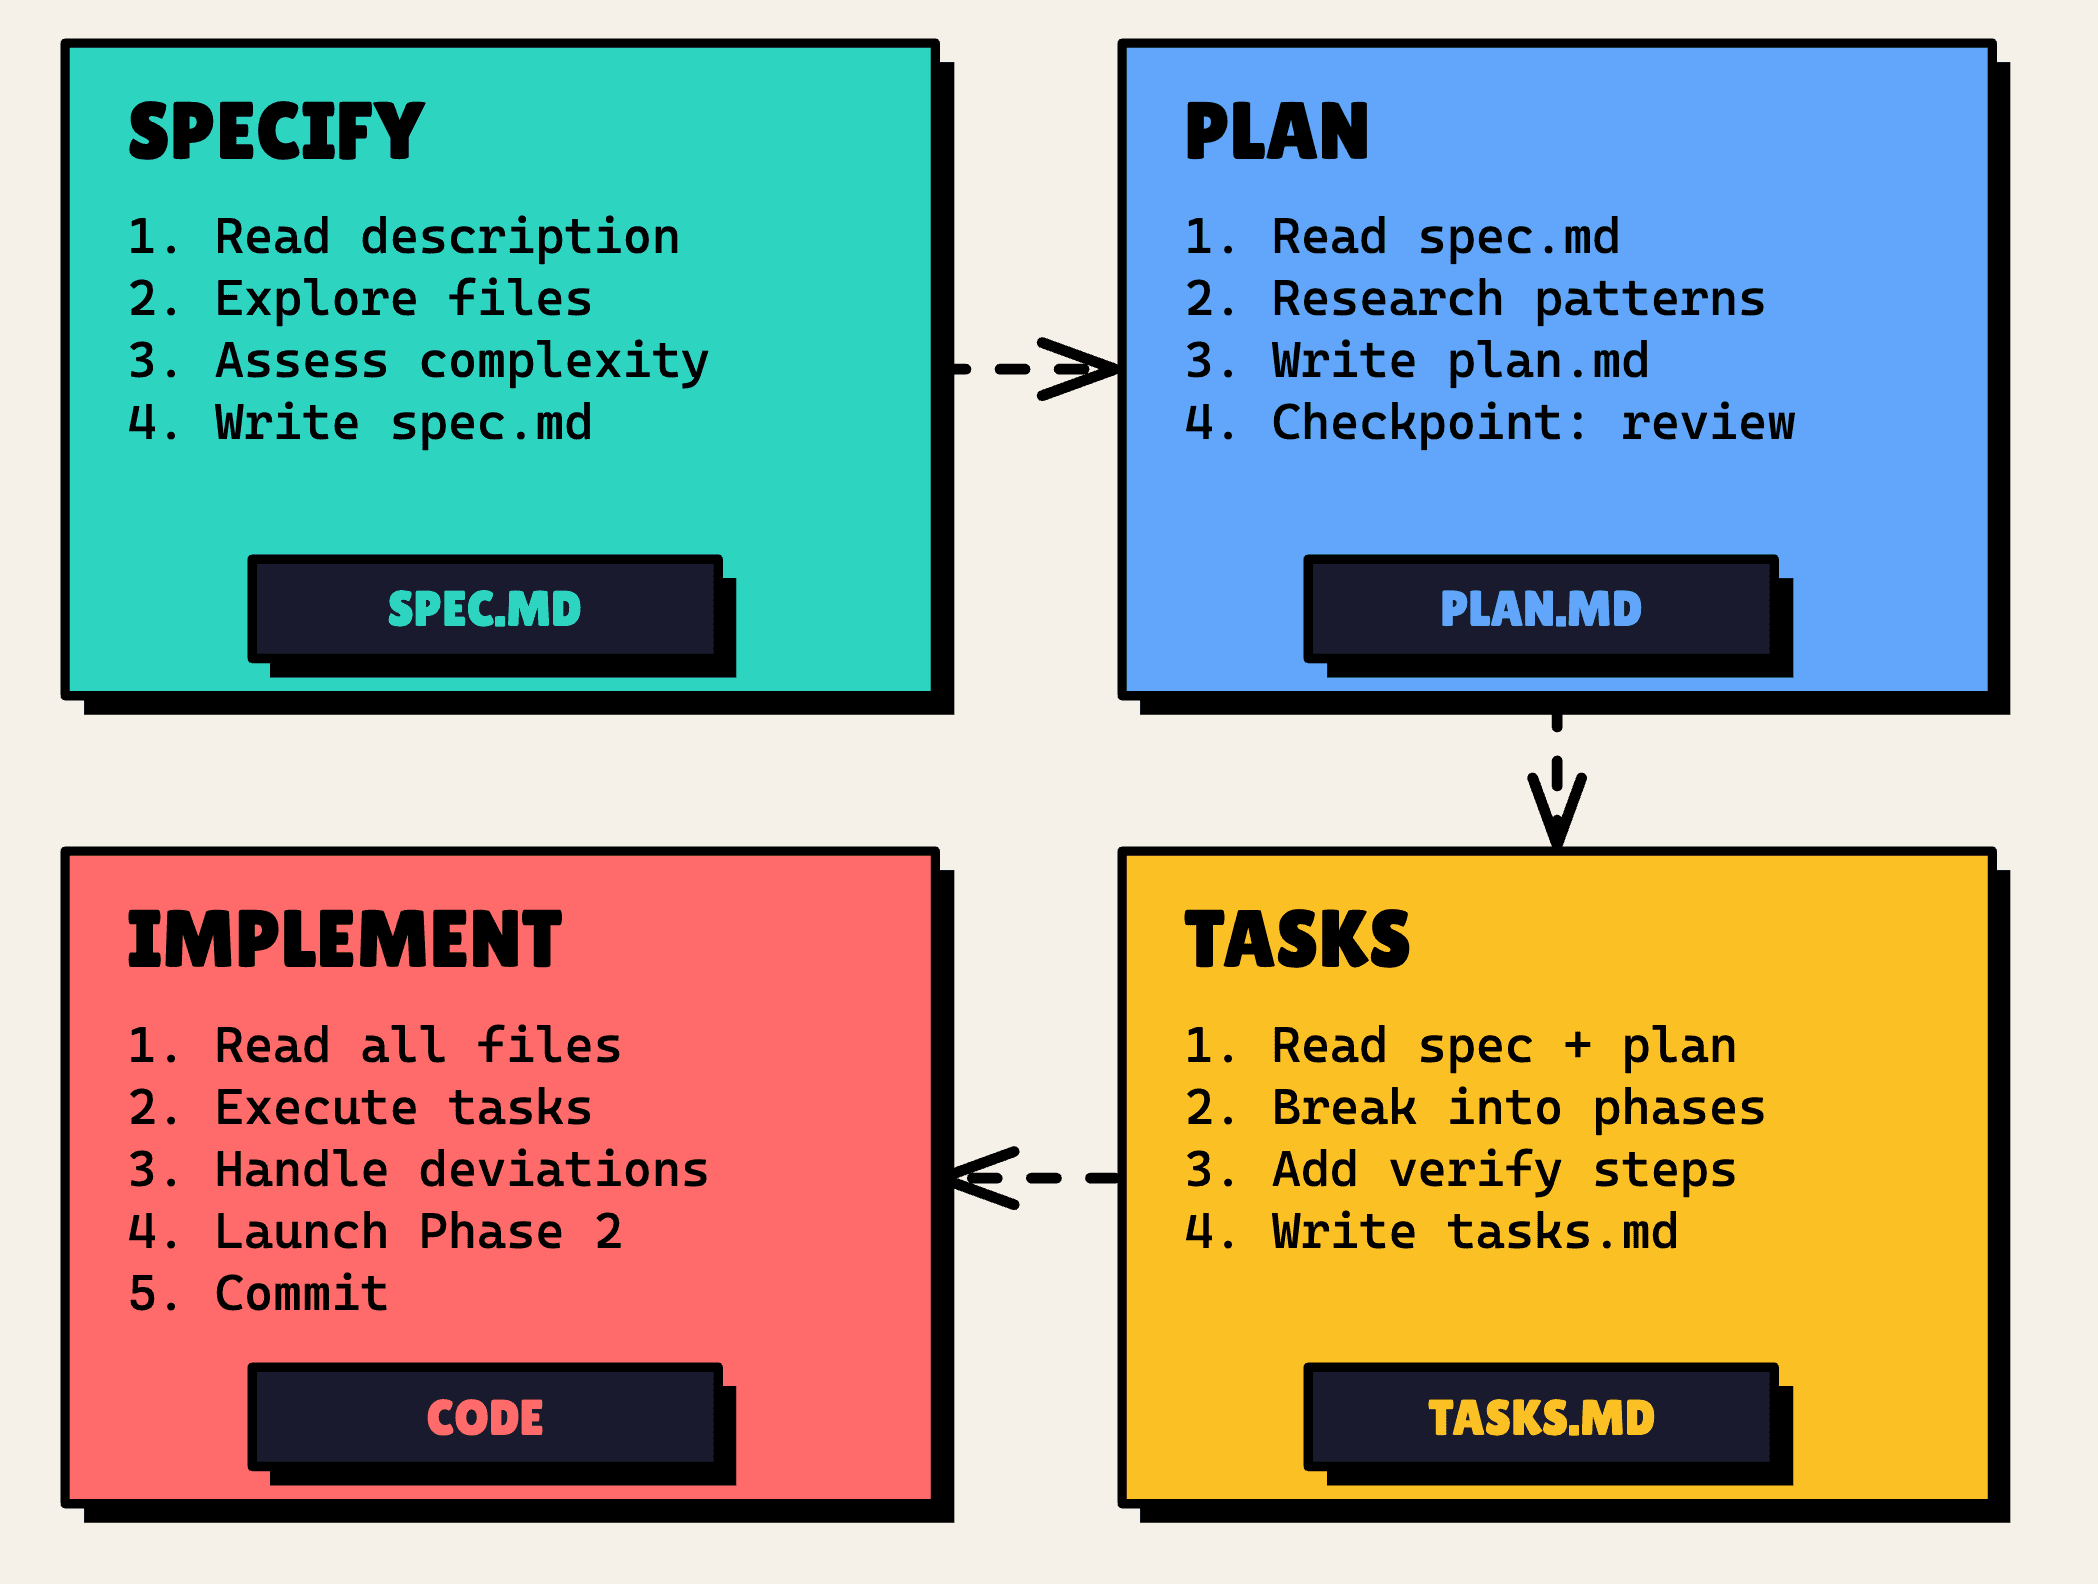
What We Kept
GitHub spec-kit gives you seven steps: constitution, clarify, specification, plan, tasks, implement, review. I only needed four.
Dropped:
- Constitution: coding rules belong in CLAUDE.md once, not re-checked per feature
- Clarify: draft first, iterate. Stop asking questions before you've seen anything
- Review: add it back as an enhancement when you need it
Kept:
- Specify: defines what you're building
- Plan: designs how to build it
- Tasks: breaks the plan into executable steps
- Implement: executes the work
So the pipeline looks like this: specify → plan → tasks → implement
- Specify →
sdd.specify→spec.md. Explores the codebase, defines what and why - Plan →
sdd.plan→plan.md. Reads the spec, designs how to build it - Tasks →
sdd.tasks→tasks.md. Breaks the plan into ordered, verifiable tasks - Implement →
sdd.implement→ Code + PR. Executes tasks one by one, commits, opens a PR
All four map to SpecKit Companion phases. The first three produce markdown files. Implement runs the sdd.implement command. It doesn't produce a file, it executes the work.
Get the Files
Here's what goes into your project. Seven files: four commands that tell the AI what to do, three templates that define what the output looks like.
Commands (.claude/commands/):
sdd.specify.mdsdd.plan.mdsdd.tasks.mdsdd.implement.md
Templates (.claude/templates/):
sdd-spec.mdsdd-plan.mdsdd-tasks.md
Grab the SDD Starter Files (Gist). Drop them in the folders above and you're ready.
Why SpecKit Companion
You could run these commands from the terminal and call it a day. But SpecKit Companion gives you something the terminal doesn't: you can see where you are. Each phase shows up in the sidebar, you click to advance, and you always know what's done and what's next. It turns a set of markdown commands into an actual workflow you can follow.
Here's the config. Add this to .vscode/settings.json:
{
  "speckit.customWorkflows": [
    {
      "name": "sdd",
      "displayName": "SDD",
      "description": "Lean 4-step SDD workflow: specify, plan, tasks, implement",
      "steps": [
        {
          "name": "specify",
          "label": "Specify",
          "command": "sdd.specify",
          "file": "spec.md"
        },
        {
          "name": "plan",
          "label": "Plan",
          "command": "sdd.plan",
          "file": "plan.md"
        },
        {
          "name": "tasks",
          "label": "Tasks",
          "command": "sdd.tasks",
          "file": "tasks.md"
        },
        {
          "name": "implement",
          "label": "Implement",
          "command": "sdd.implement",
          "actionOnly": true
        }
      ]
    }
  ],
  "speckit.defaultWorkflow": "sdd"
}
Four steps. The first three produce markdown files. Implement runs the command but doesn't produce a file; it executes the work.
Walking Through a Feature
Let me walk you through a real feature. We're adding a home page and navigation bar to an empty application, enough to see every phase in action.
Specify
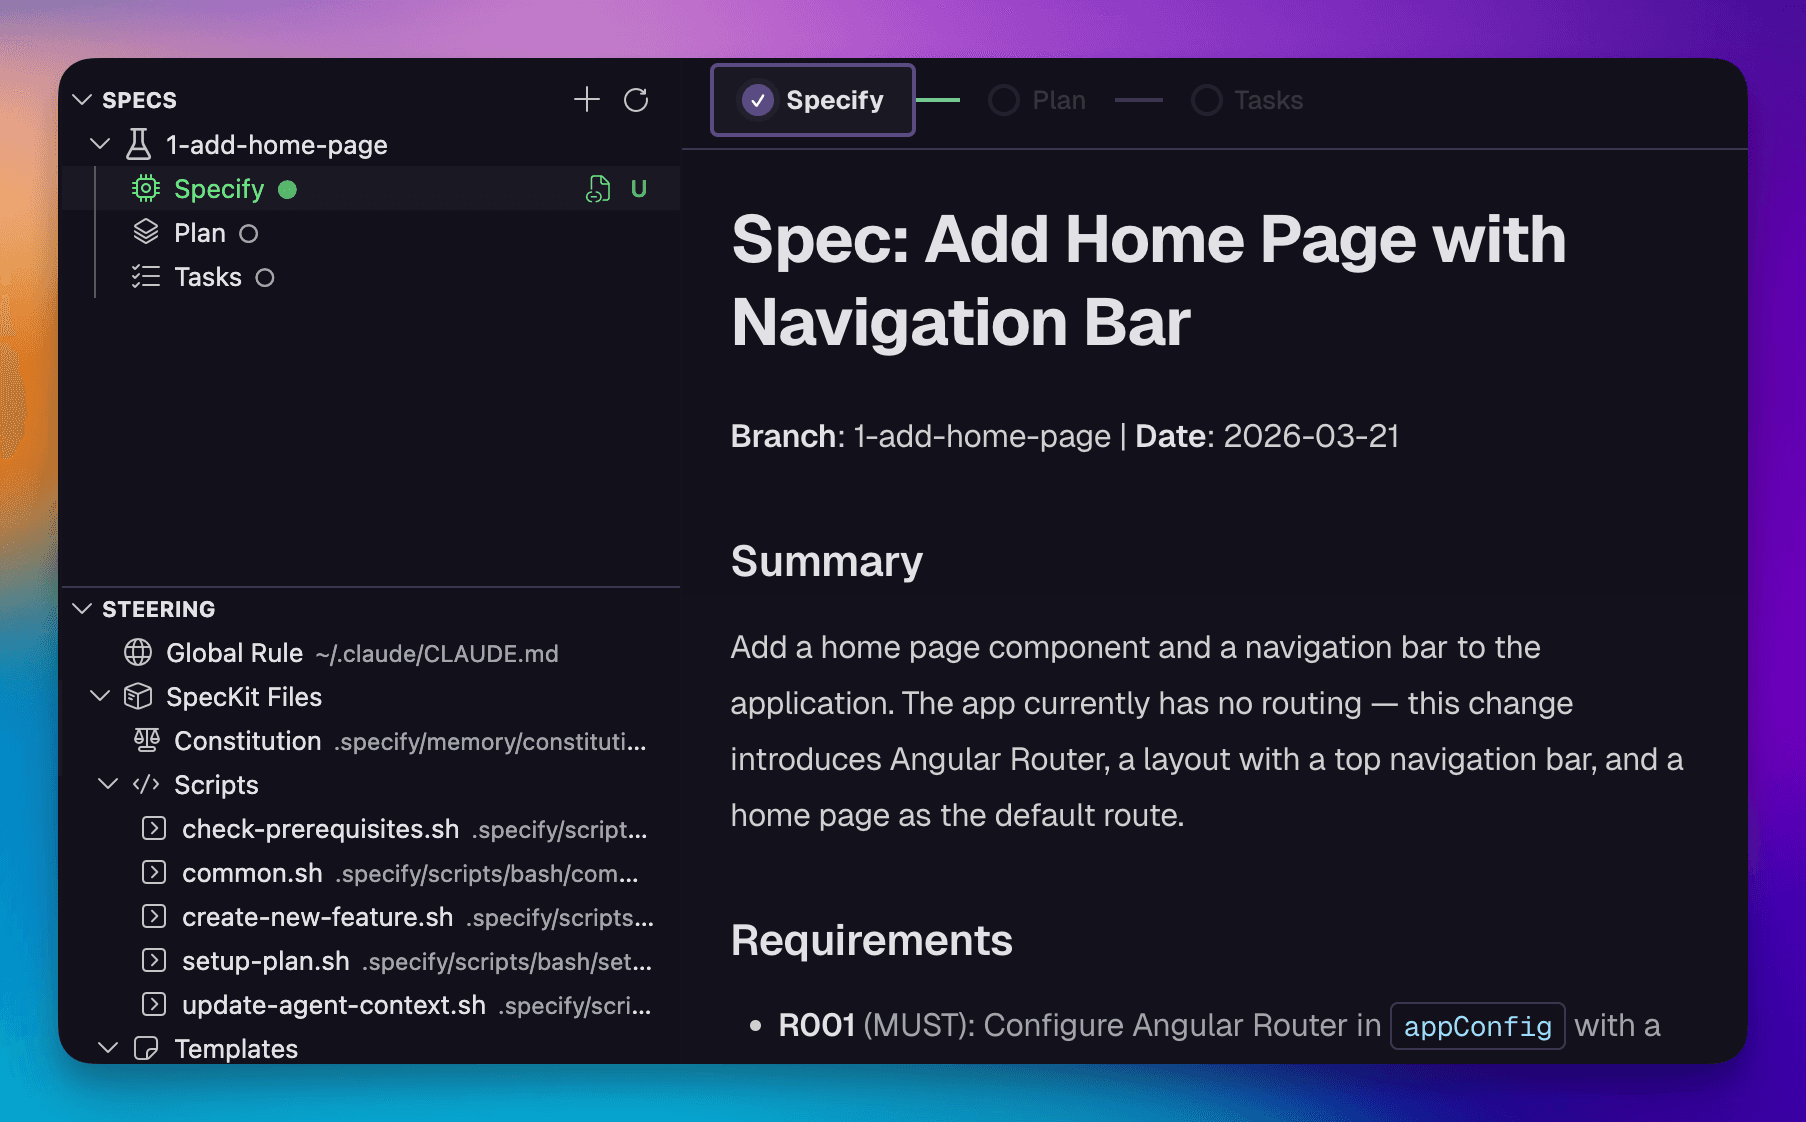
Click "+" in the SpecKit Companion sidebar, describe what you want ("Add a home page with a navigation bar"), and select the SDD workflow.
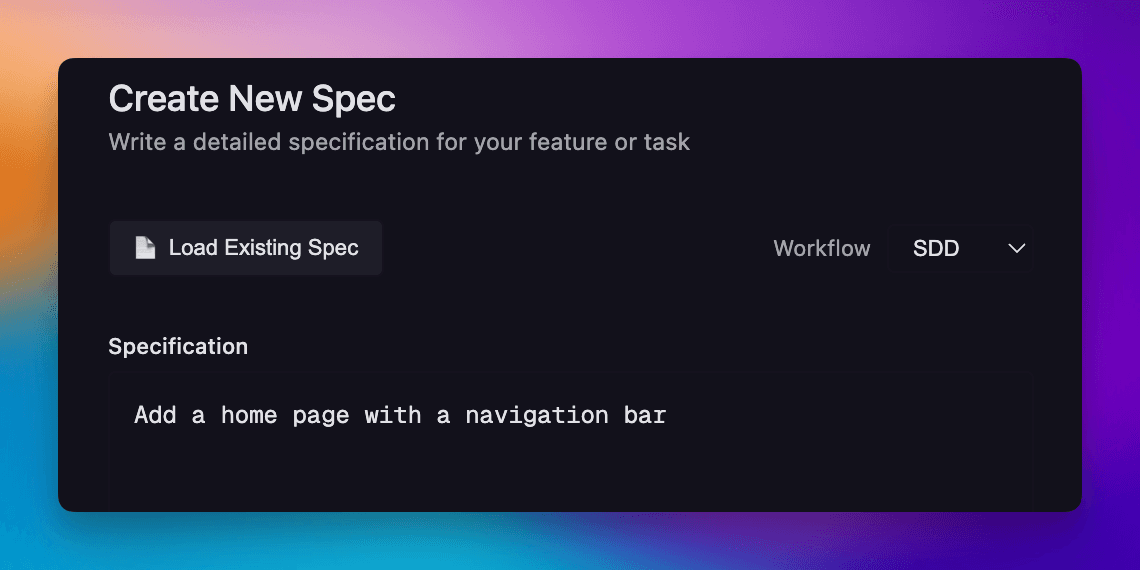
Once the specification finishes, the new spec appears in the sidebar. Open it and you'll see what we're building. Under the hood, the AI explored two or three relevant files, figured out the scope of the change, and wrote spec.md: summary, requirements with Given/When/Then scenarios, and what's out of scope.
Plan
Hit Plan at the bottom of the Specify phase. The command reads spec.md, researches existing patterns in your repo, and writes plan.md: the approach, files to create or modify, and risks.
Here's the part I like: it stops and shows you the plan before anything moves forward. You approve, edit, or reject. No guessing, no "let me just refactor this real quick" surprises.

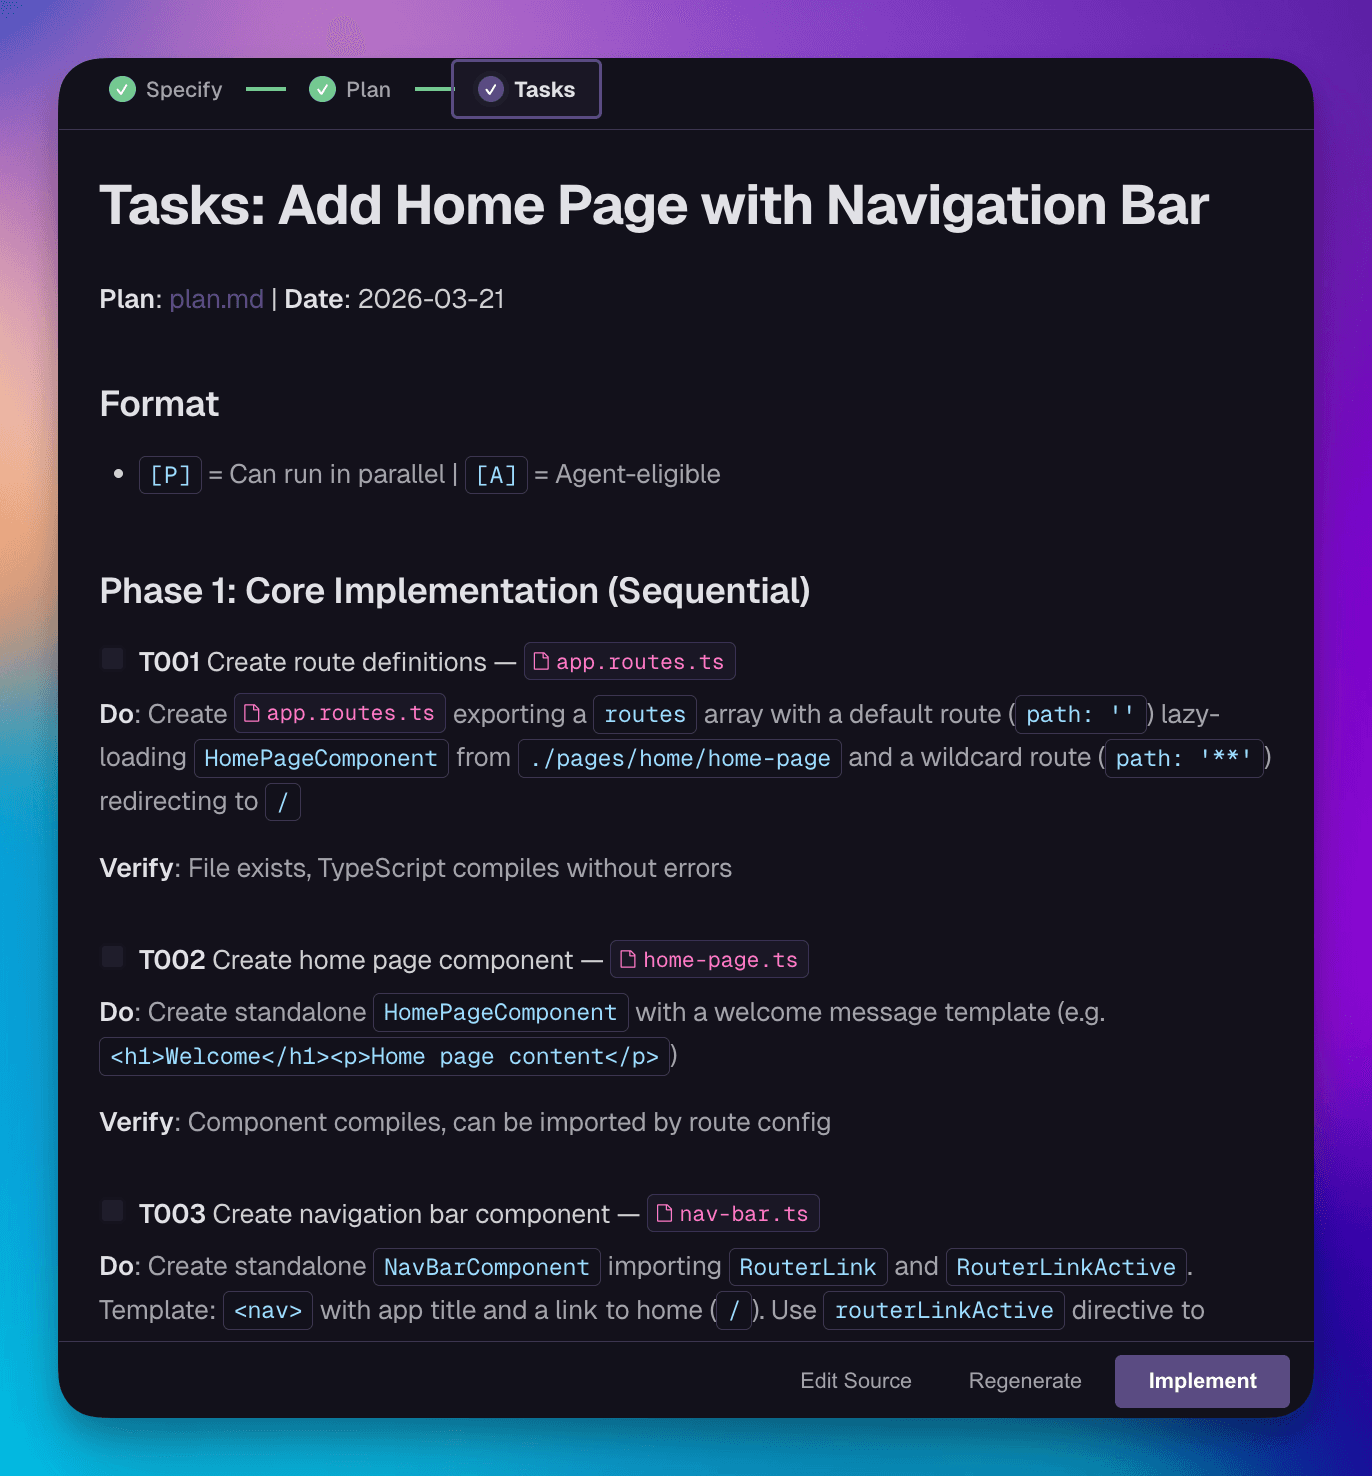
Tasks
Click Tasks. The command reads both spec.md and plan.md, then breaks the plan into phased, verifiable tasks. Each task gets a Do/Verify pair: what to build and how to confirm it works. Phase 1 runs in order. Phase 2 tasks are tagged for parallel execution (tests, docs, cleanup that can run as separate agents).
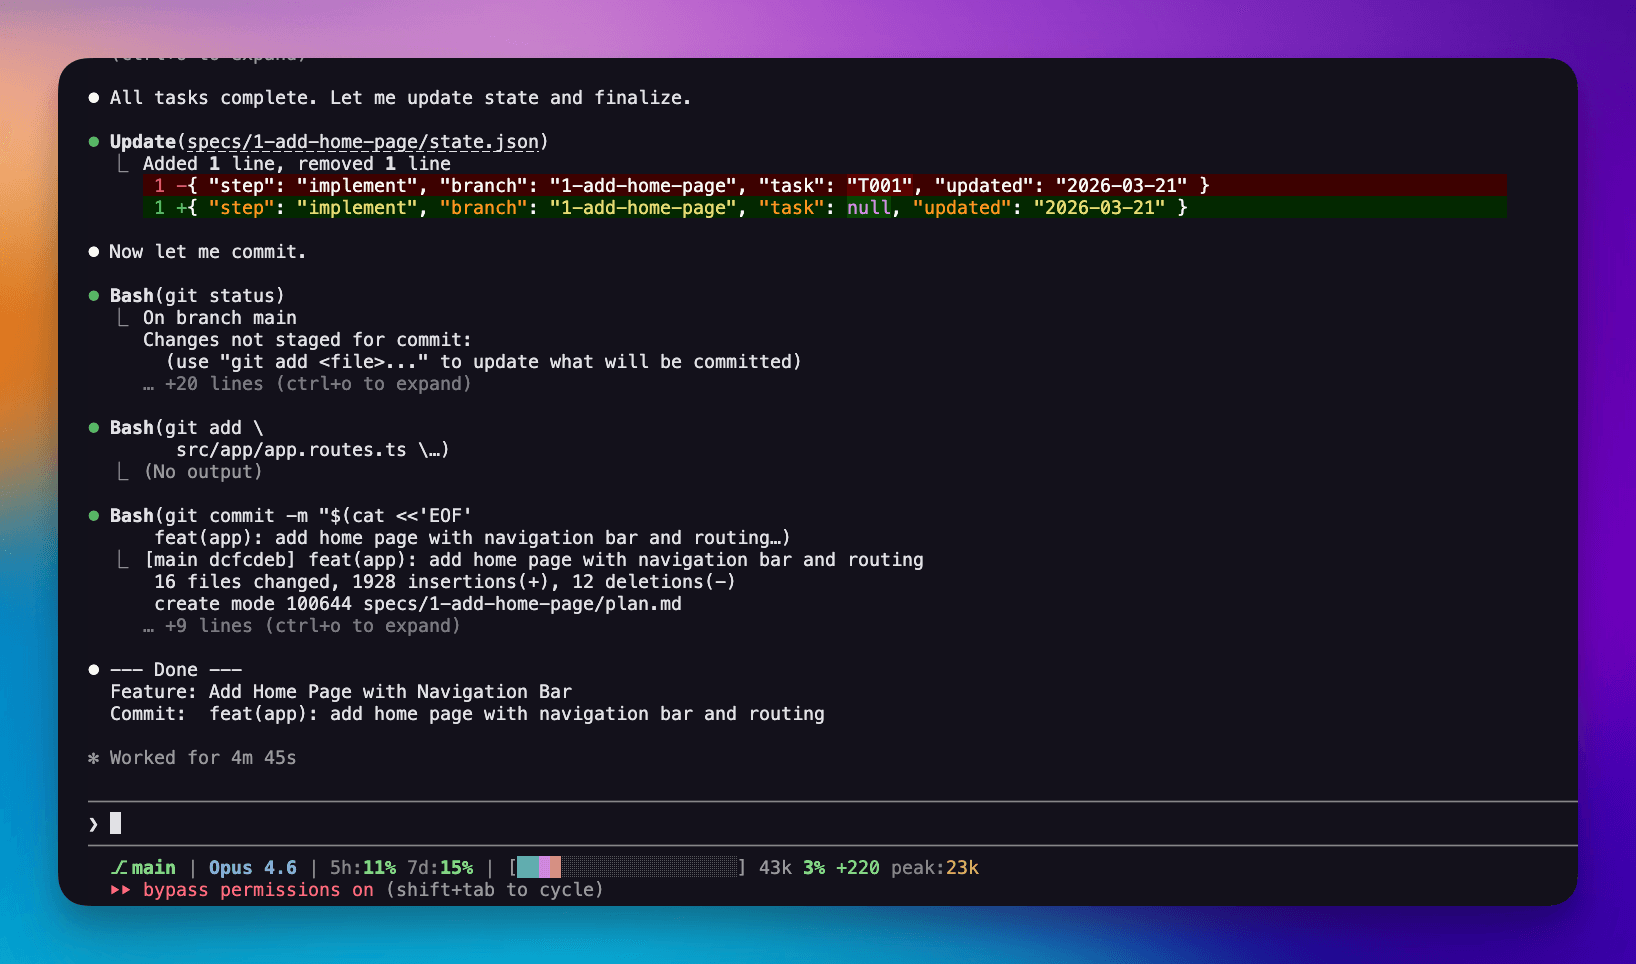
Implement
Drop to the terminal, run /sdd.implement. This is where the AI actually writes code. It reads all three files, executes Phase 1 tasks sequentially, auto-fixes small issues like import errors, but stops for anything architectural. Phase 2 agents launch in parallel. It commits and optionally opens a PR.
Implement lives in the terminal because that's where code belongs. SpecKit Companion handles planning. The terminal handles execution.
Enhance Your Workflow
That worked great for a full feature. But now imagine you need to add a title to the nav bar, a one-line change. The same four steps still run: the AI explores the codebase, researches architecture, writes a multi-file plan, breaks it into phased tasks. That's a lot of machinery for something you could describe in a sentence. Since this is your workflow, you can fix that.
Fast Mode
Open sdd.specify.md. After the AI explores the codebase, add a step that classifies the change:
📃 .claude/commands/sdd.specify.md

### 4. Detect Complexity

Based on what you found in Explore, classify the change:

| Signal                                            | Mode        |
| ------------------------------------------------- | ----------- |
| Touches 1 existing file, change is <10 lines      | **minimal** |
| Pure style or config tweak                        | **minimal** |
| Touches 2+ files, or adds a new component/service | **normal**  |

If unclear, default to **normal**.
Then add a step that only runs in minimal mode. Instead of handing off to /sdd.plan and /sdd.tasks, it generates all three files in one pass:
📃 .claude/commands/sdd.specify.md

### 6. Minimal Mode — Write `plan.md` + `tasks.md`

Skip this step if mode is **normal**.

Write `specs/{NNN}-{slug}/plan.md`:

- Approach (1-2 sentences)
- Files to change
- Phase 1 tasks with Do/Verify pairs

Write `specs/{NNN}-{slug}/tasks.md`:

- Single phase task list matching the plan
Try it: run /sdd.specify add a title to the nav bar. The command sees it's a single-file fix and collapses three steps into one. All the artifacts, none of the ceremony.
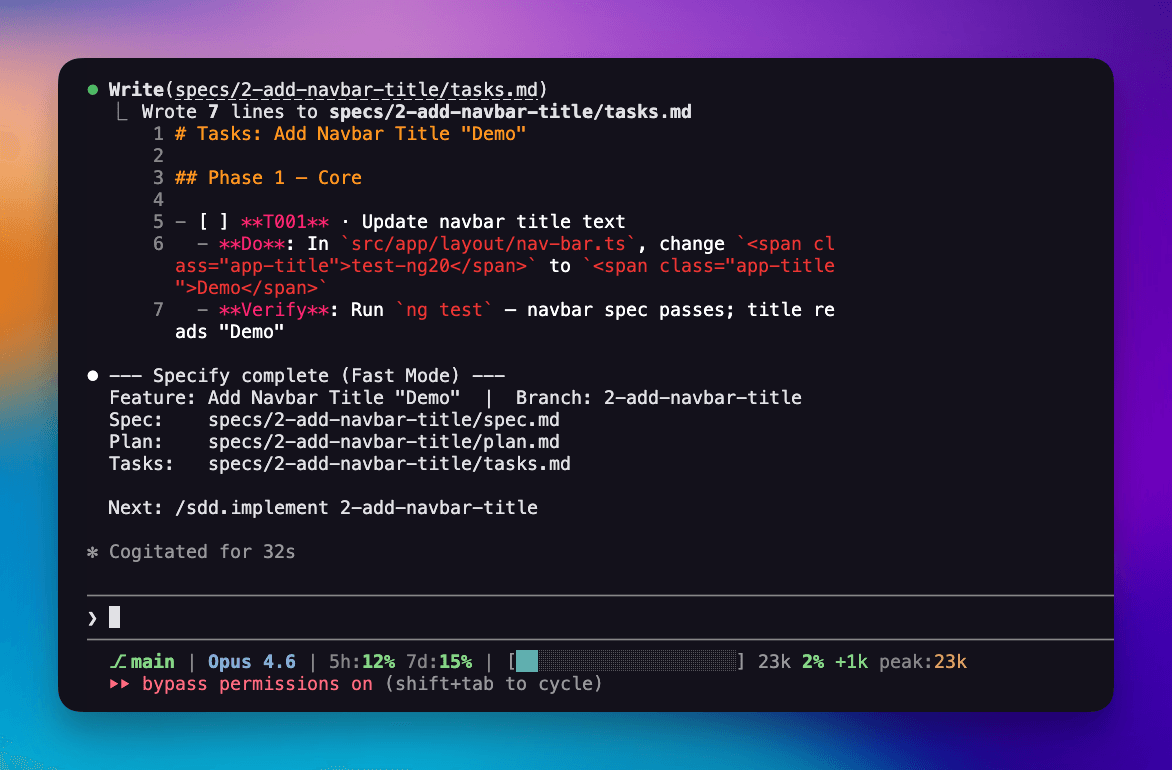
One command, and you're ready to implement.
The Checkpoint
Open sdd.implement.md. After the AI executes all tasks, add a checkpoint that presents the results for review before pushing:
📃 .claude/commands/sdd.implement.md

### 5. Checkpoint — Commit + PR

Display exactly this format, then use **AskUserQuestion**:

--- CP: Commit & PR ---
Commit: {type}({scope}): {short description}

PR title: {type}({scope}): {short description}
PR body: ## What - [bullet from spec]

    ## Why
    [one sentence from spec]

    ## Testing
    - [verify step from tasks]

Options:

- **Approve** — proceed to commit and PR
- **Edit** — user provides notes; apply changes, redisplay
Run /sdd.implement. The AI creates a branch, executes the task, and then stops. Before anything gets pushed, it shows you exactly what changed, the commit message, and the PR body. You approve, edit, or reject. Nothing leaves your machine without your sign-off.
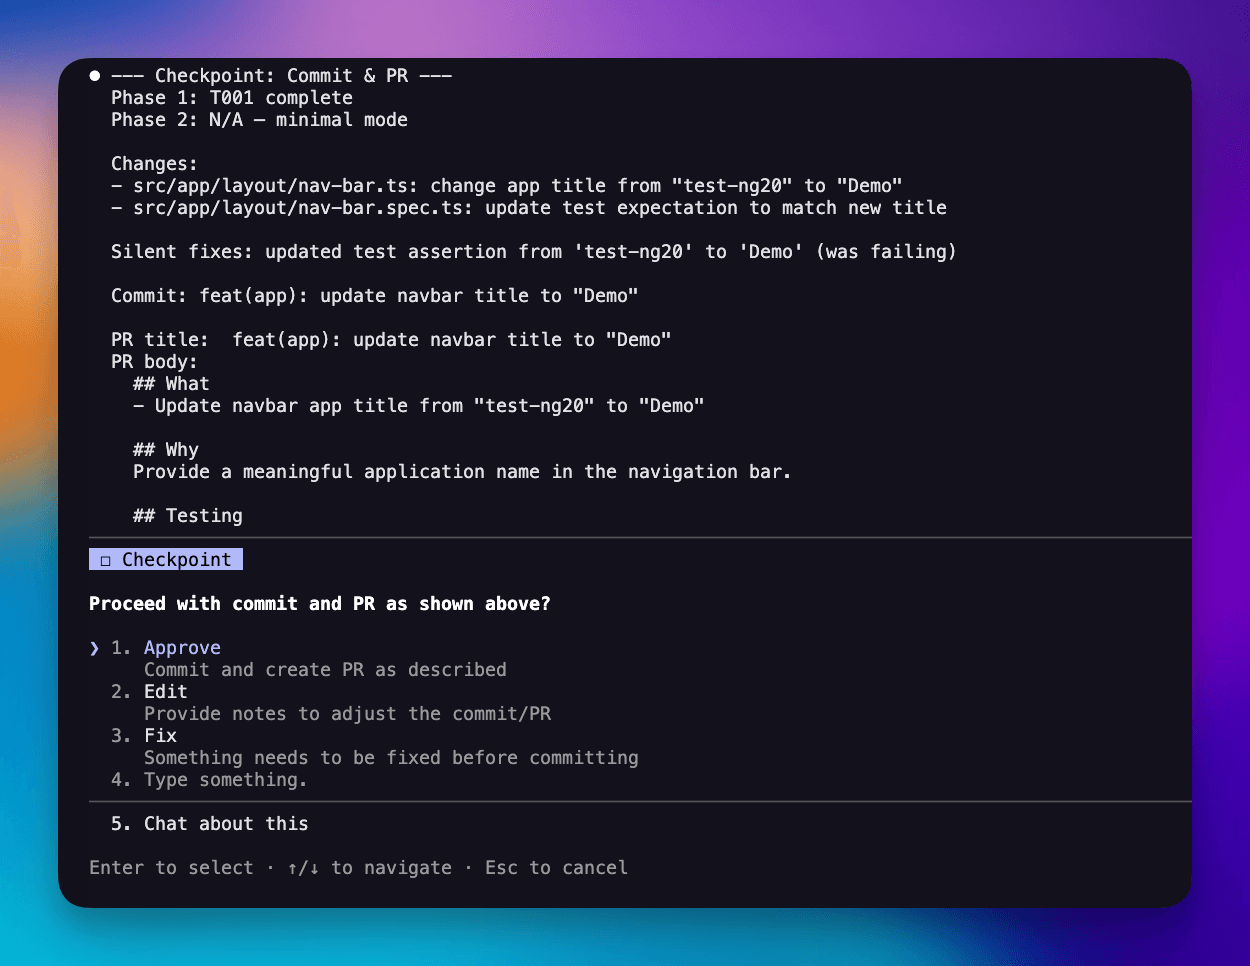
Two interactions total. Full traceability. And if you don't like the PR title, you fix it right there.
Make It Yours
You just saw two customizations in action: a complexity check in sdd.specify.md and a checkpoint in sdd.implement.md. Both are just markdown rules you can tune or remove.
Every step works the same way. Want "Security Considerations" in every spec? Add one line to sdd.specify.md. Want conventional commits? Add a rule to sdd.implement.md. Want TDD enforced? Add "write tests before implementation" to sdd.tasks.md.
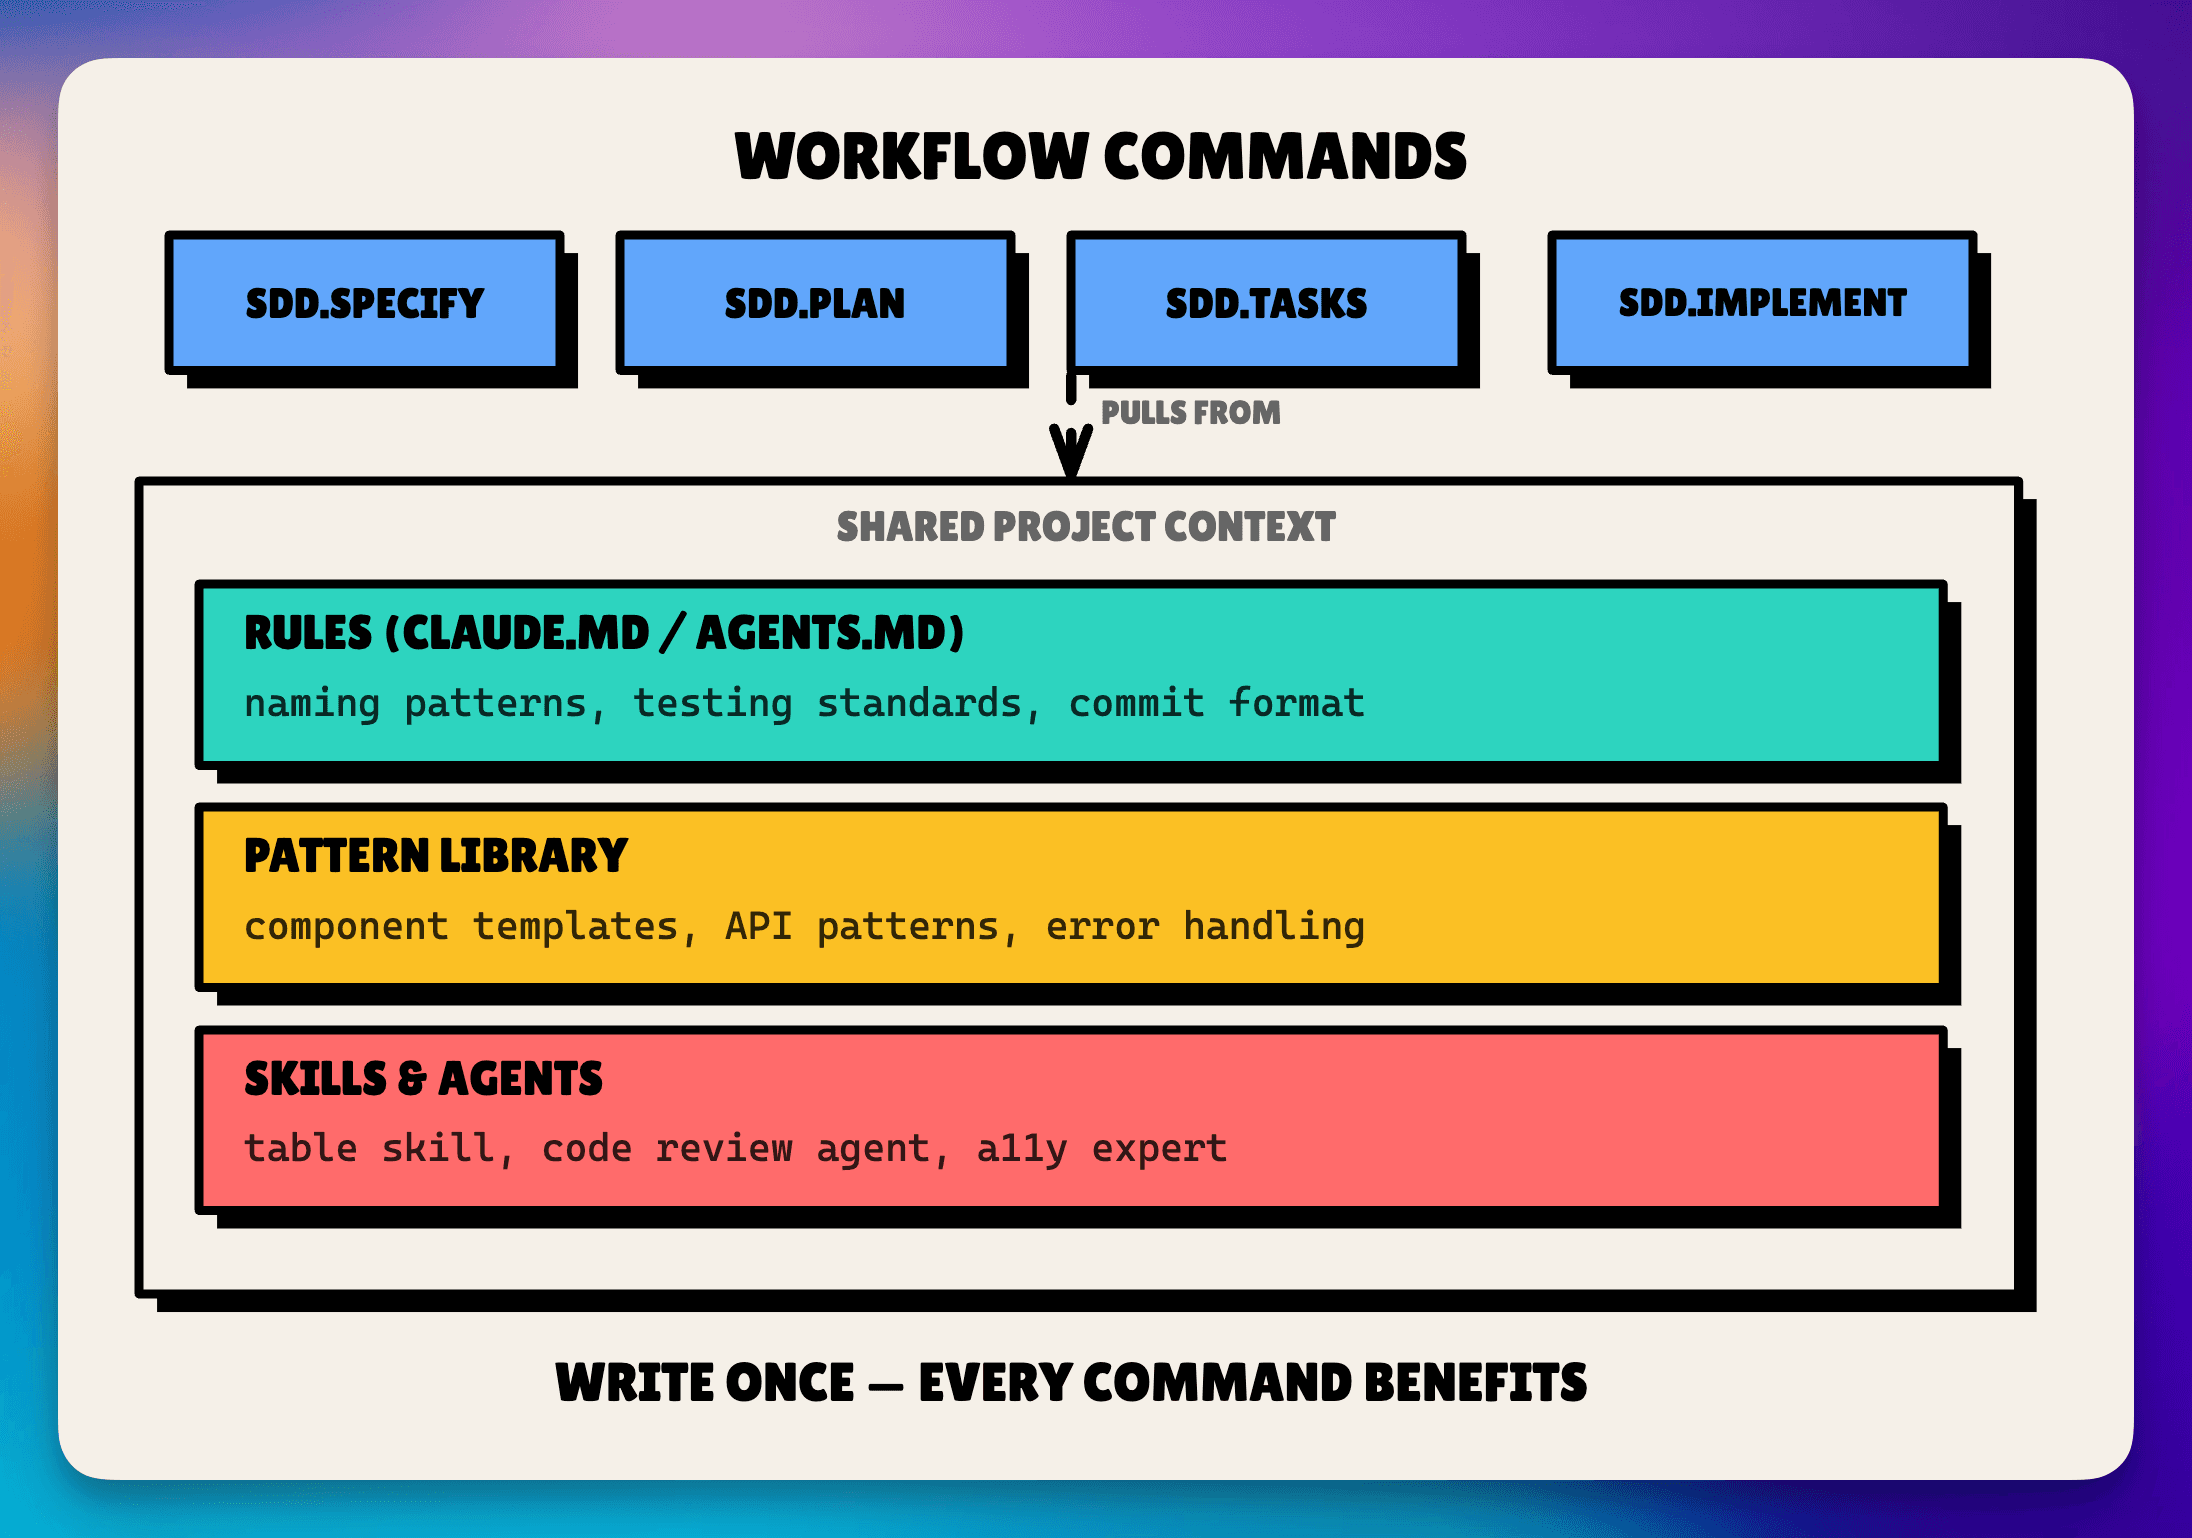
And the workflow commands are just the first layer. Add rules in CLAUDE.md, build a pattern library, wire in specialized agents. Each layer makes the next one better.
- Layer 1: Workflow commands.
sdd.specify.md,sdd.plan.md,sdd.tasks.md,sdd.implement.md. The structure. - Layer 2: Rules. CLAUDE.md / AGENTS.md. Naming, testing, commit standards. Written once, applied to every feature.
- Layer 3: Pattern library. "Here's how we do X." Component templates, API patterns. The AI matches your codebase instead of guessing.
- Layer 4: Skills and agents. Specialized tools called during steps. Route TypeScript to a code reviewer, HTML to an accessibility expert.
It's all markdown. Improving it is trivial.
Get Started
- Grab the SDD Starter Files (Gist): 4 commands + 3 templates
- Configure SpecKit Companion: copy the settings.json snippet above
- Demo repo: the project from this walkthrough, with all commands and config ready to clone
- Evolving version: I'm building on this at alfredoperez/sdd, a Claude Code plugin incorporating the best patterns from 8+ open-source AI workflows
Install SpecKit Companion from the VS Code Marketplace, drop the files, and start shipping. Next up: how to scale this across a team with shared specs and conventions.