


Achieving a better developer experience in your integration tests with StoryBook and Cypress


Table of contents
At SailPoint, end-to-end (E2E) tests were one of our biggest user interface (UI) workflow problems. We used Selenium for our E2E tests, which made it hard to develop and debug tests quickly. Selenium is a programming language that UI developers aren’t usually accustomed to. Secondly, and perhaps more importantly, using this tool to troubleshoot and visualize what is happening in the UI at each test step is a challenge.
Setting up the environment/application in Selenium was another big hurdle we had to jump through with E2E. Most tests require a specific application setup to recreate certain scenarios. This is problematic because it requires the user to have a substantial amount of knowledge about the application. Not to mention that bringing configurations up and down takes time.
Last, but not least, it’s a hassle to troubleshoot flaky tests. At the time, we only had a video to decipher what was happening, and since the tests were “flaky” most of the time, it was near impossible to reproduce locally. This means the user had to guess the problem and the solution and try multiple times until they believed the flaky tests were gone. This is not a process I would recommend.

As mentioned in a previous article, we now use StoryBook to document our component library. We use it as our “workshop” or component development tool, where we can easily recreate states and complicated scenarios.
The second part of our one-two-punch solution is Cypress. Cypress lets you write tests with JavaScript or TypeScript and makes it fun and easy to find bugs in tests.
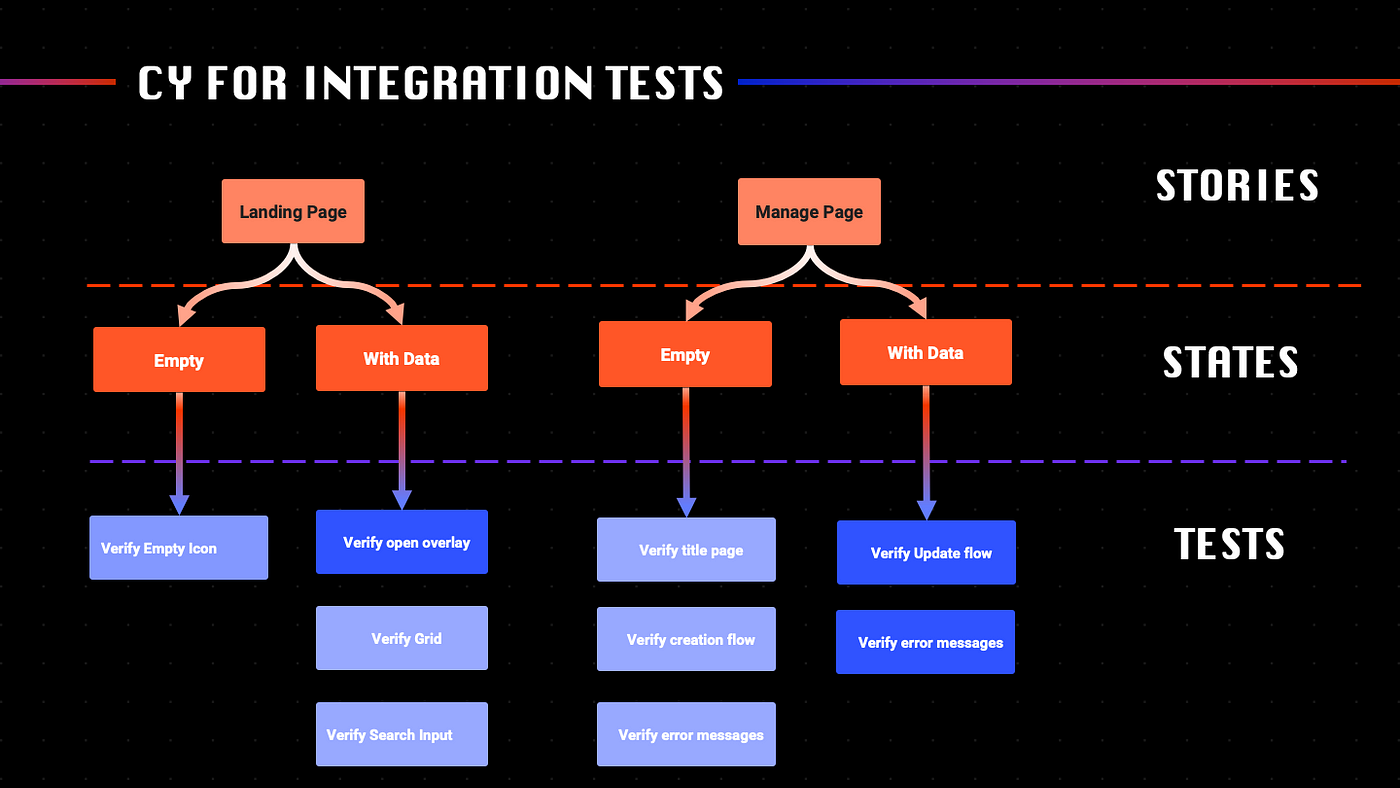
One notable improvement in our test philosophy is that we no longer write many E2E tests. Instead, we perform most of the tests as integration tests using StoryBook stories, with only a few E2E tests to ensure that the application still works.
I have a few recommendations to make engaging with StoryBook and Cypress while using Angular even easier for you!
Create a StoryBook Shared Module
First, I recommend creating a specific Angular module with all the shared modules and configurations you need in your stories.
In our case, we added the most common components, icons, and even the setup of the localization. Thanks to this, it is easier to bootstrap stories. Here we can see an example of how SailPoint uses it:
export default {
 title: 'Components/Form Fields & Inputs/List/Input/Stories',
 component: ListInputComponent,
 decorators: [
  moduleMetadata({
   imports: [
       StorybookCoreModule,  👈
       FormsModule,
       ListInputModule
   ]
  })
 ],
 args: {
  label: {
   untranslated: 'Demo Label'
  },
 },
} as Meta;
Create StoryBook API Interceptor
We created a StoryBook API interceptor to help us simulate the backend and recreate multiple states, such as stories in pages or container components, all while using the interface ApiRequestMock.
ApiRequestMock includes properties to make mocking API requests and responses easier:
/**
 * The Request to be mocked by the HTTP Interceptor
 */
export interface ApiRequestMock {
 /**
  * The URL or the RegExp to match the URL
  */
 url?: string | RegExp;
 /**
  * A function that can be passed to check for a match request and return specific HTTP Response
  */
 requestMatcher?: (request: HttpRequest<unknown>) => HttpResponse<unknown>;

 /**
  * The HTTP Method to match the request
  */
 method: 'DELETE' | 'GET' | 'HEAD' | 'JSONP' | 'OPTIONS' | 'POST' | 'PUT' | 'PATCH';

 /**
  * The mocked response
  */
 response?: unknown;

 /**
  * The Status to return in the request
  */
 status?: number;

 /**
  * Any delay to apply to the request
  */
 delay?: number;

}
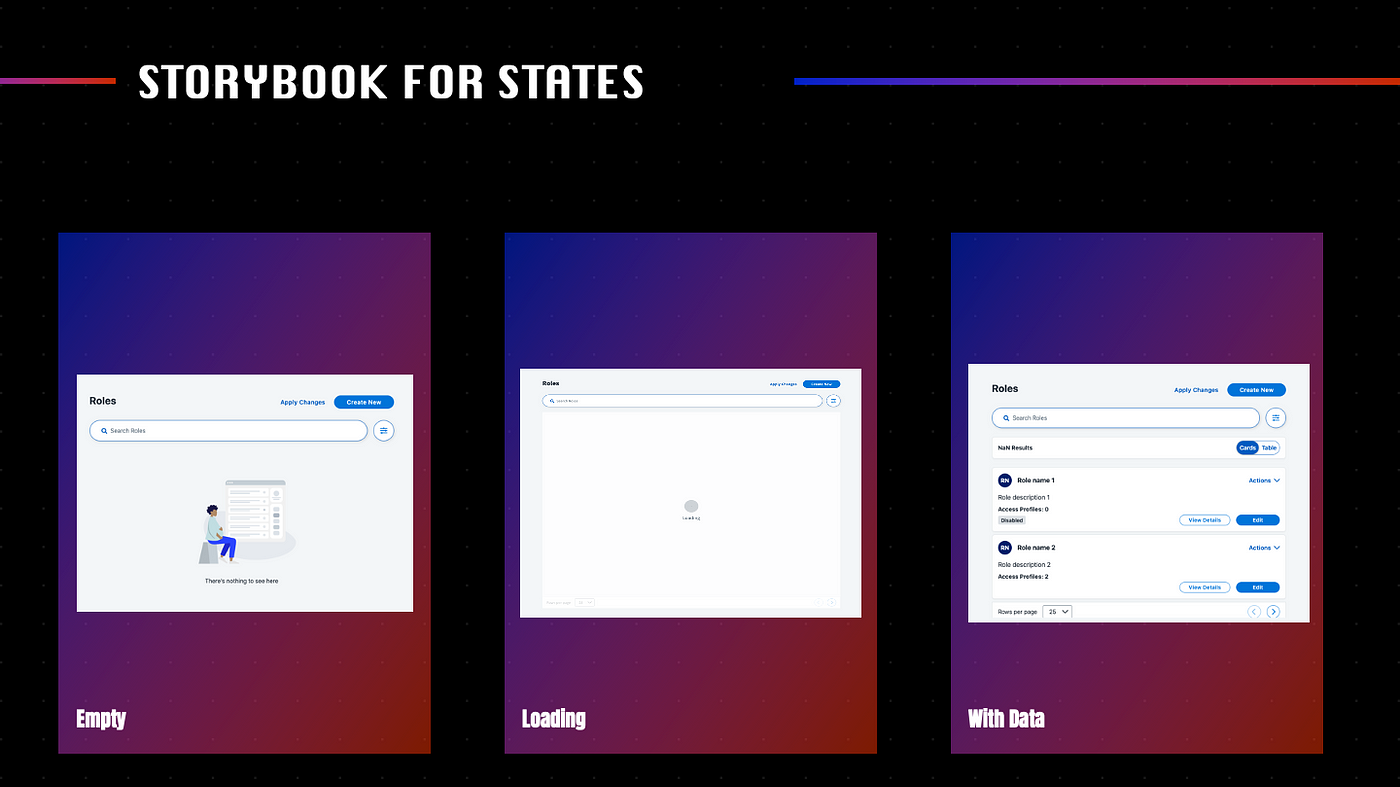
By using this and the interceptor, it was a breeze to setup the data to mock page states in the stories. As shown in the example below:
const Template: Story<LandingPageComponent> = args => ({ props: { ...args } });

/**
 * Empty landing page story
 */
export const Empty = Template.bind({});
Empty.decorators = [
  moduleMetadata({
 providers: [
 {
  provide: HTTP_INTERCEPTORS,
  multi: true,
  useValue: new StoryBookApiInterceptor([
   {
    method: 'GET',
    url: `beta/access-profiles`,
    response: [] 👈 Returns an empty array to simulate
         a landing page with no records
   }
        }
          ...
];


/**
 * Landing page story with data
 */
export const WithData = Template.bind({});
WithData.decorators = [
  moduleMetadata({
 providers: [
   {
  provide: HTTP_INTERCEPTORS,
  multi: true,
  useValue: new StoryBookApiInterceptor([
   {
    method: 'GET',
    url: `beta/access-profiles`,
    response: getMockedData(10), 👈 Returns an array with datato simulate
            a landing page with data
         }
       }
      ...
];
Create Angular Components for Complex Stories
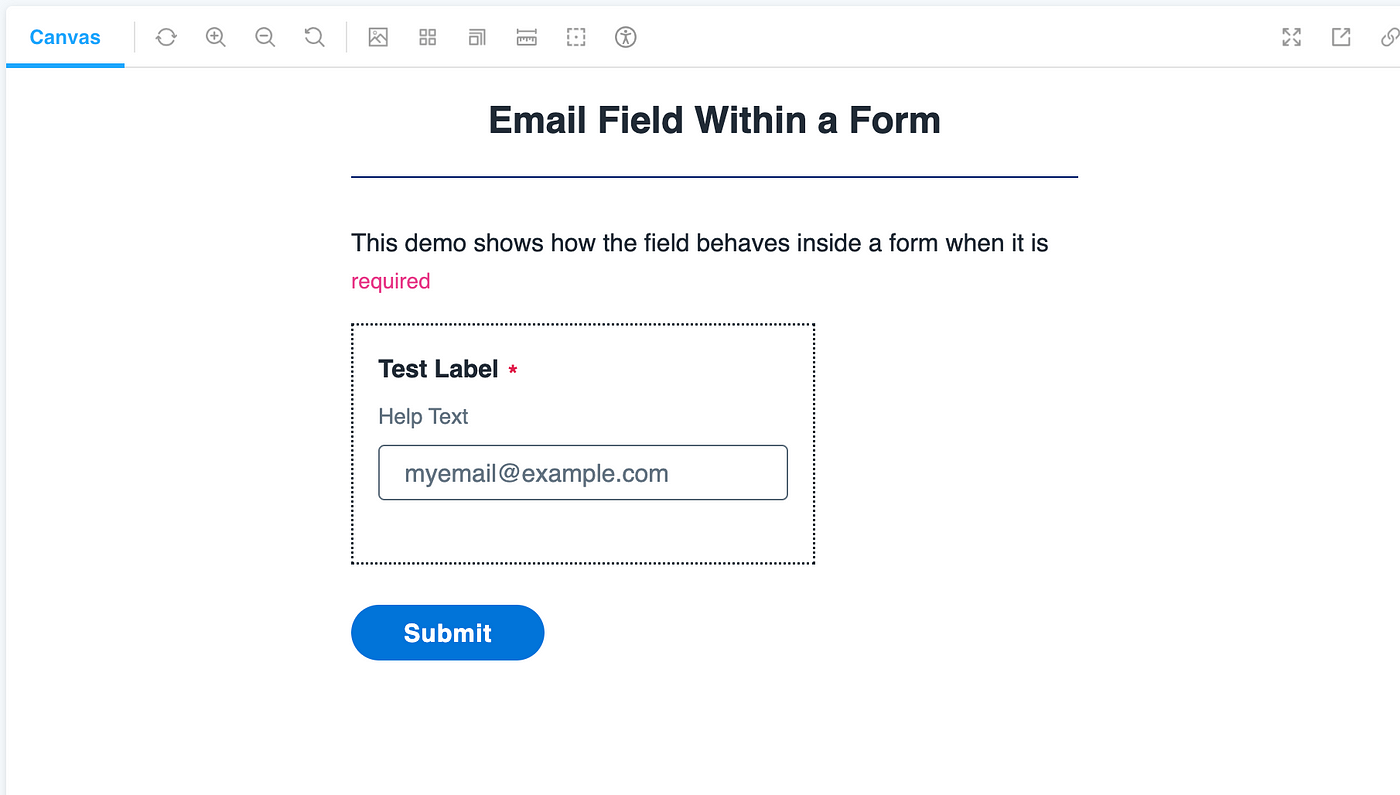
Sometimes you cannot demo all the features of a component in a story by just changing the arguments, like, whenever you want to demo how a field or input behaves within a form control group. For these circumstances, we created an Angular component with a layout that helps us identify stories that add extra code to the component.
The following shows the HTML of a story that demonstrates the behavior of an email field within a FormControlGroup:
<story-demo-layout [demoWidth]="300" [width]="500">
  <story-demo-title>Email Field Within a Form</story-demo-title>

  <story-demo-summary>
    This demo shows how the field behaves inside a form when it is required
  </story-demo-summary>

  <slpt-email-field
    [group]="formControlGroup"
    [control]="emailFieldControl"
    [key]="controlName"
    [label]="Email"
  ></slpt-email-field>

  <story-demo-controls>
    <slpt-button (click)="handleSubmit()" [label]="Submit"></slpt-button>
  </story-demo-controls>

  <story-demo-output>
    <div *ngIf="submitted">
    <small>Submitted Value: </small>
    <p><code> {{ formControlGroup.controls[controlName].value }}</code></p>
    </div>
  </story-demo-output>
</story-demo-layout>
Here is how the story looks:
Create Cypress Commands to work with StoryBook
Now, let’s switch gears and talk about how to improve your developer experience while using Cypress.
The first two things that come to mind, are the creation of helper methods and Cypress commands to make it faster to access stories.
We were so inspired by some of the commands in this repository. We decided to make our version of the methods. Namely, the Cypress commands visitStorybook and loadStory to go to a specific story and the helper method executeStoriesImageTests to take screenshots of all the stories for a component.
Here is an example of how we use them:
describe('Review step', () => {
  const storiesCategory = 'review-step-stories’;

 before(() => {
    cy.visitStorybook();  //👈
  });

  👇
  executeStoriesImageTests(storiesCategory, [‘default', 'with-selected-attributes']);

   describe('With selected attributes', () => {

    before(() => {
       cy.loadStory(storiesCategory, 'with-selected-attributes’);   👈
    });

    it('should show success message on save', () => {
       …
     });

  });
});
Reuse mocks between StoryBook and Cypress
As mentioned before, we created an interceptor to mock API responses for stories. However, it is also helpful to organize those mocks so that they can be reused in Cypress tests and even in unit tests. Knowing that we’ve since been creating objects with the mocked data and placing them in a separate file. To inherently not keep it specific to either the story, the Cypress file, or even a specific story or test.

Create utilities for Visual Regression Tests
Visual regression tests are one of the most difficult obstacles to overcome. In essence, it appears simple; go to a specific URL for a story and take a screenshot. But it is more complicated than that because you must deal with different viewports and scrollbar types depending on the OS, or even if the components are not completely loaded or in the state you expected them to be at the same time.
I could use a separate article to explore all the solutions/hacks we had to do to make this work, but here are my top 3 TL;DR recommendations:
Use the same browser in your local and CI/CD environments.
Create a helper function to use in Cypress to standardize viewports and any other setup you need before taking the screenshot.
Create an Angular Module to set up specific fonts and styles or standardize how the scrollbar will look regardless of the OS.
Use DeploySentinel to Fix Flaky Tests
Lastly, we are exploring the use of DeploySentinel in our CI/CD pipelines to troubleshoot flaky tests. Since DeploySentinel provides the whole DOM, network, and console events when the test fails, this is the best way to debug flaky tests and understand the root cause of the problem. Trust me, it is way better to see the DOM than just try to guess what is wrong by looking at screenshots or videos.

Conclusion
StoryBook is a fantastic tool to use as your workshop/workbench for component creation. It has provided our engineers at SailPoint the ability to demonstrate components and page functionality to all stakeholders, not just front-end developers. And now, with the tips and tricks laid out in this blog, you can also find ways to create stories for complex container components and pages with StoryBook Shared Moduling and API Interceptor.
Using Storybook and Cypress together is a one-two-punch strategy for easing integration and preventing regression issues. This combination can improve your developer experience by creating reusable Cypress commands, screenshot utilities, and easy-to-configure component states. Consider DeploySentinel the cherry on top, enabling developers to troubleshoot the always-loved “flaky” tests quickly.