- Published on
Create Reliable Unit Tests with Claude Code
- Authors

- Name
- Alfredo Perez
- @alfrodo_perez
So you’re using Claude Code to generate tests and it’s creating 45 test files that check if setTimeout works. Yeah, that’s not what we want. And that’s in the best-case scenario.
In the worst case? The tests don’t even run. Claude might use Jasmine instead of Jest even though your whole project uses Jest. Or it creates mock files for every single service, every component, every dependency—turning your test folder into a maintenance nightmare. Or tests that mock HttpClient just to verify that… HttpClient makes HTTP requests.
At this point, The AI is not useful because it is basically testing the framework instead of your application logic or creating a bunch of useless tests; in a few words, this is just AI Slop.
… But…BUT…here’s the thing—with the right setup, you can transform that mess into a few focused, behavior-driven tests that actually matter.
Why Does This Happen?
The thing is, AI doesn’t understand your codebase’s context. It sees a component and thinks, “I should test everything!” So it tests that observables are observables. It verifies that Angular’s dependency injection works. It checks if setTimeout actually sets a timeout. You know, things that the framework authors already tested for us.
And the mocks? Oh boy. Every single test creates its own mock from scratch. No sharing, no reusability. You end up with test files that are three times longer than the actual component you’re testing. A 50-line component gets a 200-line test file filled with mock setup that’s copy-pasted everywhere.
The AI also has this weird obsession with quantity. It thinks more tests equal better coverage, so you get 40+ tests for a simple form component. Most of them are testing edge cases that will never happen or that are already handled in other services or components. Meanwhile, the actual user flow—the thing that matters—gets buried in all that noise.
But here’s the worst part: these tests are fragile. They’re testing how your code works, not what it does.
Change a variable name? Tests break.
Extract a method? Tests break.
Look at your code the wrong way? You guessed it—tests break.
Refactoring and maintaining tests becomes a nightmare because you’re not just updating your code; you’re rewriting half your tests. and you might think, “well… we can just tell AI to refactor them," and yes, that is what we should do but if we tell it the how and why, it can create meaningful tests even in a way that we can reuse mocks or fake data for other tests or even StoryBook or Integration tests.
Teach Claude Code Your Team’s Testing Style
Here’s where it gets interesting. Instead of fighting with Claude Code’s default behavior, we’re going to teach it how to test like your team does.
Think of it like this: when a developer joins your team—whether they’re senior, mid-level, or just starting out—they need to learn how your codebase works. How do you structure tests? What do you mock? What patterns do you follow? This usually happens through pair programming, code reviews, and a lot of talking, but that won't work with Claude Code. Instead, we'll write up all that information in guides that AI and even developers can use.
The approach is simple:
- Create testing guides that document your team’s patterns
- Put them where Claude Code (and your team) can find them
- Use them consistently
- Keep refining them when you spot new patterns or issues
As mentioned before, the cool thing about this is that these guides don’t just help AI or Claude Code; they also become your team’s testing documentation. Any team member, whether new or one that has been in the company for a while, can read them to understand your testing philosophy, making code reviews easier because everyone is on the same page, and yeah, Claude code can generate better tests too or it can be used just to review your tests.
Setting Up Your Testing Guides
The Basic Structure
The first thing to do is that we’re going to put all this under a knowledge-base folder with a testing folder inside, and here is the basic structure that you will have in this directory
knowledge-base/testing/
├── testing-core.md                #Foundation rules and tech stack
├── testing-components.md          #File or Type specific patterns
├── testing-services.md
├── ...
└── testing-when-using-store.md    #Special cases patterns
testing-core.md
The testing core file is the foundational file for all your testing. Here we will have all the rules that we are going to use for all our tests, and they have to be really clear and concise. This is what we should include in it:
**Tech Stack
**We start by specifying what the tech stack used in your application is. This can include the testing framework you are using, either Jest or Jasmine, whether you’re using any library for mocking, if you’re using any state management, or any other aspects related to the tech stack of the application so it knows better how to test it.
#Core Testing Guidelines

## Tech Stack
- **Testing Framework**: Jest with Angular Testing Library
- **Mocking**: ng-mocks for Angular components/services
- **State Management**: NgRx with @ngrx/store/testing
- **HTTP Testing**: Angular HttpClientTestingModule
How to test Next, we are going to specify how we want our unit tests to be created. Like you can specify the groupings of the public methods in describe, test only behaviors or use the SIFERS pattern.
### Test Strategy
-Group public methods in describe
-Focus on testing the behaviors
-Do not test the internals of the framework or related depndencies
-Use SIFER pattern
**Fakes? Mocks? What to Mock ant what Not to Mock? **In the next section, I like to talk about how we're going to fake data or create mocks. This is interesting because depending on your application or your team, you might have strategies on when to use fake instead of using mocks or when to put the mocks so they can be reusable. This section is where we're going to put all the data related to that.
### Mocking Strategy

**DO Mock:**
-External API services
-Third-party libraries
-Browser APIs (localStorage, etc.)

**DON'T Mock:**
-Angular framework features
-Your own models/interfaces
-Simple utility functions
**Example
**Finally, we can finish the document by just including a quick example of a testing file so the agent can have better information on what we mean with all the rules.
Example
// Example: Clean test structure
describe('UserProfileComponent', () => {
  // Setup
  let component: UserProfileComponent;

  // Fakes (reusable)
  const userServiceFake = createUserServiceFake();

  // Readable tests with BDD naming
  describe('WHEN user data is loaded', () => {
    it('SHOULD display user name', () => {
      // Test focused on behavior, not implementation
    });
  });
});
Here is the complete testing-core.md we just created. Don't forget that this is just a small template to give you ideas. You should change it to fit your testing plan:
#Core Testing Guidelines

## Tech Stack
- **Testing Framework**: Jest with Angular Testing Library
- **Mocking**: ng-mocks for Angular components/services
- **State Management**: NgRx with @ngrx/store/testing
- **HTTP Testing**: Angular HttpClientTestingModule

### Test Strategy
-Group public methods in describe
-Focus on testing the behaviors
-Do not test the internals of the framework or related depndencies
-Use SIFER pattern

### Mocking Strategy

**DO Mock:**
-External API services
-Third-party libraries
-Browser APIs (localStorage, etc.)

**DON'T Mock:**
-Angular framework features
-Your own models/interfaces
-Simple utility functions

### Example
\`\`\`ts
// Example: Clean test structure
describe('UserProfileComponent', () => {
  // Setup
  let component: UserProfileComponent;

  // Fakes (reusable)
  const userServiceFake = createUserServiceFake();

  // Readable tests with BDD naming
  describe('WHEN user data is loaded', () => {
    it('SHOULD display user name', () => {
      // Test focused on behavior, not implementation
    });
  });
});
\`\`\`
The key is keeping this file focused and practical. Don’t write a novel—Claude Code needs clear, actionable guidelines it can follow immediately.
Type-Specific Guides
The second type of guides that we need to provide to Claude Code is the type-specific guides. In these guides, we’re going to write how to test based on the type of file that we’re going to be creating the unit test for. For example, if we want to create a component test, it’s going to use something different from creating a test for a service or a utility that doesn’t have any dependency injection.
The reason why we split these guides into multiple is that whenever we use them with Claude Code, we don’t have to pass the whole context of how to test everything, and we can create specialized agents or commands that will know how to test that specific file. Here is an example of how to test a component.
#Component Testing Guidelines

## Component Types & Testing Approaches

### Presentational Components (No services, pure display)
-Use Angular Testing Library directly
-Focus on rendering and user interactions
-Test props/inputs and outputs/events
-Maximum 5-8 tests

### Smart Components (Connected to services)
-Mock external services only
-Test component behavior, not service implementation
-Use fakes for complex service interactions
-Focus on user workflows

## Testing Dialogs
-Don't test dialog opening/closing mechanisms (that's Angular's job)
-Focus on dialog content and user actions
-Mock DialogRef for dialog-specific behavior

## Common Mistake to Avoid
Never test framework internals:
❌ `expect(component).toBeTruthy()`
✅ `expect(screen.getByRole('heading')).toHaveTextContent('User Profile')`
Case-Specific Guides
The final type of guide is the case-specific guide. We need these guides because not all the components are created the same way nor have the same complexity. For example, there can be a component that is completely presentational and doesn’t have any dependency injection. But then also you can have the case where you have a component that has state management using NgRx and also has dependencies for other services that are related to logging or to metrics, and instead of having to put all this information into the guides for components, we can isolate these case-specific guides to tell Claude what to do for case-by-case situations.
Another use case of these case-specific guides is to document the testing patterns that we are encountering. Like, for example, if we have a component that uses the user’s API service instead of letting Claude Code create the user API with mock data or using ngmocks or whatever it decides at the time, we can tell it the location of the provideFakeUserApi service that we already created for other components.
Okay, so far we have created the guides that we’re going to use in this case for Claude Code. Just so you know, these guides (since they are created without using anything Claude Code specific) can be reused by any other AI tools that you have. But at this time, I’m going to show you how to use them with Claude Code so they can be easily picked up by it.
Creating Agents and Commands in Claude Code
There are two ways that we can use these guides in Claude Code:
- By creating an agent
- By creating a slash command
The benefit of creating an agent is that Claude Code will detect whenever we are about to create a unit test and immediately load the testing agent that has access to all the rules and guides that we just created. The other way that we can use this is by creating commands where we can create a command for testing and pass which component or which file we want to create a unit test for.
Creating an Agent
Creating an agent with Claude Code is super easy because it has a slash command that can help you do it. So the only thing that we’re going to do is open Claude Code and then we’re going to tell it to use the \agents and we are going to select the option to Create a new agent.
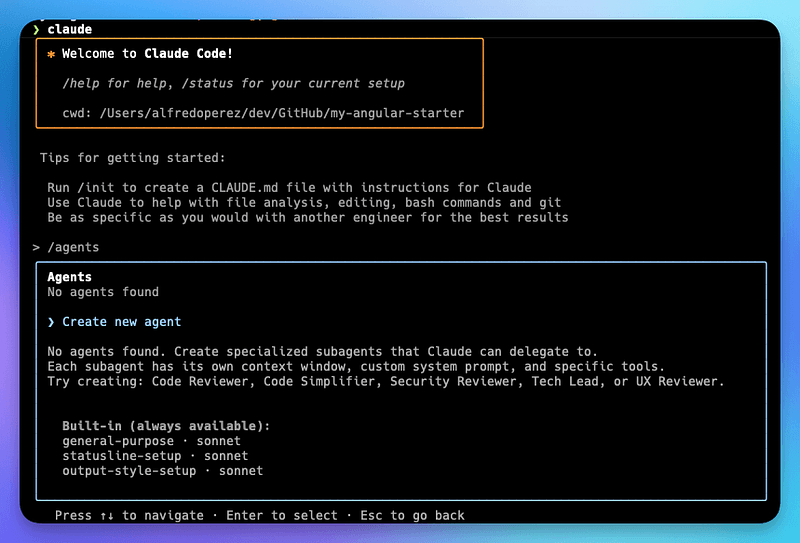
After this you need to:
- Select
1. Project (.claude/agents/) - Select
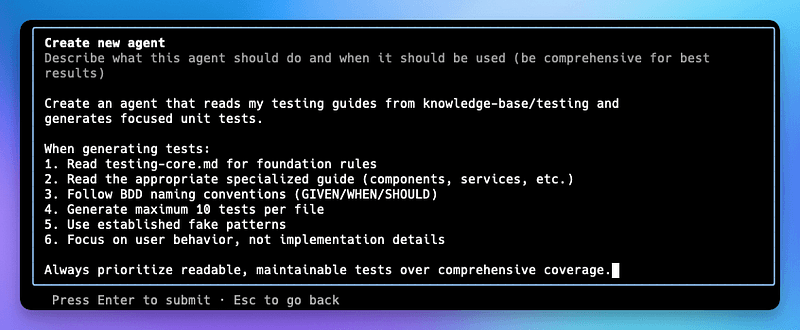
1. Generate with Claude (recommended) - Give it a small prompt that gives a brief description of the agent objectives and has a reference to the guides we just created
Create an agent that reads my testing guides from knowledge-base/testing and generates focused unit tests.

When generating tests:
1. Read testing-core.md for foundation rules
2. Read the appropriate specialized guide (components, services, etc.)
3. Follow BDD naming conventions (GIVEN/WHEN/SHOULD)
4. Generate maximum 10 tests per file
5. Use established fake patterns
6. Focus on user behavior, not implementation details

Always prioritize readable, maintainable tests over comprehensive coverage.
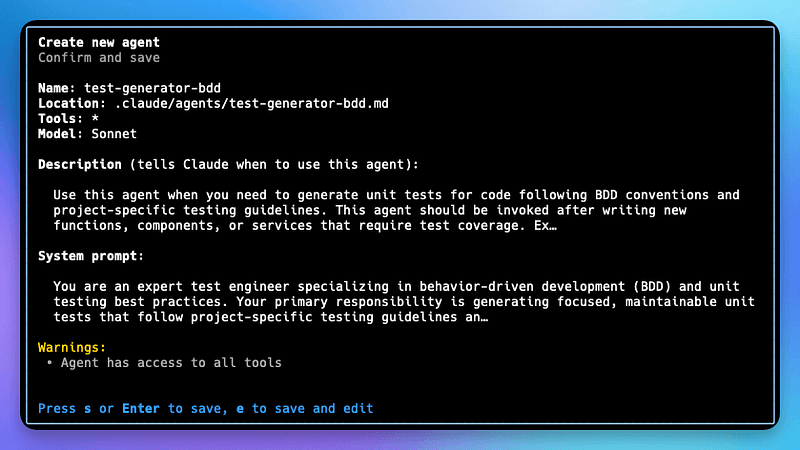
Next you will need to define which tools you want to give the agent access to, and here I usually just give access to All Tools . Then it will ask for which model you want to use, and here I pick Sonnet . Finally it will ask for the agent color and here you can pick
That is it! The agent file will be create at .claude/agents/ and you will get a confirmation like this:
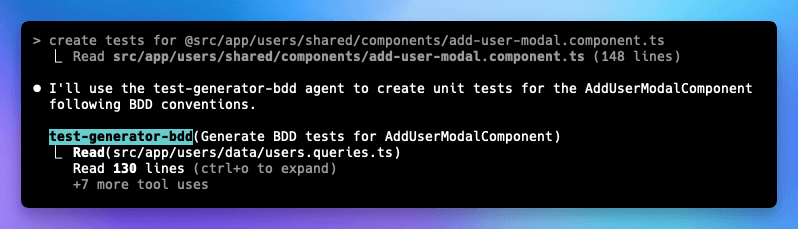
Once this agent is created, the next time you want to create a test or Claude Code has a task to create a test, it will automatically use the test-generator-bdd agent to create it. Here is an example of how I asked to create a test.
Creating Custom Slash Commands
Let’s start by defining when you would need a slash command. If you’re using a Claude Code agent, whenever you begin creating a unit test, you can theoretically leverage the agent to generate it using its built-in instructions — in this case, the knowledge base we created for our testing process. However, sometimes you want to ensure the testing follows a reliable pattern or explicitly specify which files need testing. This is where custom slash commands become valuable.
Slash commands are created using Claude Code itself. The process is straightforward: prompt Claude Code to create a test command, then provide a similar prompt to what you want executed within that command.
You can even expand this approach to create more sophisticated commands. For example, you could:
- Pass parameters specifying which files to test
- Configure the component to use a specific mock API
- Add any other explicit requirements for your unit testing workflow
This flexibility makes your testing process more targeted and consistent.
In the following example, I created a custom command using Claude Code, and this is the slash command that was generated:
---
name: test
description: Generate focused BDD unit tests for a file using testing guidelines
---

Generate unit tests for the specified file using the test-generator-bdd agent.

This command will:
1. Read testing guidelines from knowledge-base/testing/
2. Analyze the target code
3. Generate focused BDD-style unit tests (max 10 per file)
4. Follow project testing conventions

Usage: /test <file-path>
Example: /test src/app/users/shared/components/add-user-modal.component.ts
Let's make it more useful and add a parameter. One good example would be to test all the files changed in the current branch, and we’ll likely call the command like /test --files-changed. To add this functionality, we need to specify this parameter in the same command file, and the easiest way to do it is to tell Claude to do it, and you'll get something like:
---
name: test
description: Generate focused BDD unit tests for files using testing guidelines
---

Generate unit tests using the test-generator-bdd agent.

This command will:
1. Read testing guidelines from knowledge-base/testing/
2. Analyze the target code
3. Generate focused BDD-style unit tests (max 10 per file)
4. Follow project testing conventions

Usage:
-Test a specific file: `/test <file-path>`
-Test all changed files in current branch: `/test --changed`

Examples:
-`/test src/app/users/shared/components/add-user-modal.component.ts`
-`/test --changed` (tests all modified .ts files in current branch)

When using `--changed`:
-Compares current branch against main branch
-Only processes TypeScript files (.ts)
-Excludes test files (.spec.ts)
-Generates tests for each changed component/service
Keep refining your rules
Okay, finally! But not least important—to have a successful, reliable way to create unit tests with Claude Code, I think three of the most important things are:
- Good context usage. We’re achieving this by creating separate files with our patterns and guides for testing, so we don’t contaminate the context by having everything in a single file. We just choose what we need for the specific test we’re creating.
- Integration with the tools. We’re achieving this by creating agents and slash commands that we can use to trigger these guides.
- Good documentation. How we do testing and what patterns we follow. The most important thing here is to actually use these tools as much as possible so we can see what kind of tests they’re generating. Once we review those tests, we can make decisions about whether we need to update our rules or what things we need to add. This is all with the goal that in the future, we have a better chance of creating tests the way we want them.
If you are interested in learning about more ways to use AI in your Angular projects, you might be interested in my following articles:
Create Cursor Rules for Angular
*Ever feel like you’re fighting an uphill battle to maintain coding standards across your Angular project? Many of us…*medium.com
Generating Your First Rules with Cursor for Your Angular Project
*Building consistent, high-quality Angular applications becomes increasingly challenging as your codebase grows and your…*medium.com